Usage
Data Types
You can pass NumPy arrays to the “set” methods (e.g. setJointPosition) in order to command the robot.
However, you must ensure the format of the array is correct.
Arrays that have a dtype of np.float32 are the only ones that can be accepted.
See how the commands are set in the the examples.
Collecting Data from the Robot
We provide additional functionality to the LBR client application class that enables data collection to a text file. In Python, simply add the following
app = fri.ClientApplication(client)
app.collect_data(file_name)
The string file_name should contain the file name for the data file.
We use the comma-separated values format for the data file, and so the file name should end with the extension .csv - note, if this isn’t the case then .csv is automatically appended to the given file name.
The columns in the recorded csv file are as follows:
index: the index of the recorded data, starts at 0, and is incremented by 1 at each call to thestepmethod.time: the time of the command, starts at 0.0, then is incremented by the sample time at each call to thestepmethod.record_time_nsec: the epoch time collected when the data in the current time step is recorded.tsec: controller time as specified by the FRI in seconds. See FRI documentation forgetTimestampSec.tnsec: controller time as specified by the FRI in nanoseconds. See FRI documentation forgetTimestampNanoSec.mp1, ..., mp7: The measured joint position for the robot.ip1, ..., ip7: The ipo joint position for the robot.mt1, ..., mt7: The measured torque for the robot.et1, ..., et7: The external torque for the robot.dt: The sample time specified on the KUKA controller.
See the LBRJointSineOverlay.py example that demonstrates how to easily collect data from the robot.
Example Applications
Note
Make sure you followed Hardware Setup first.
Warning
Do always execute in T1 mode first.
First, ensure the corresponding Java applications for each example are installed (these were supplied with KUKA Sunrise). Then turn on the robot, connect your laptop via ethernet, and follow these steps on your laptop.
Change directory:
cd /path/to/FRI-Client-SDK_Python/examplesRun examples
Hand-guiding
Source code: hand_guide.py
This demos allows the user to hand-guide the robot’s end-effector through estimating applied forces via the external joint torques.
Remote side configurations:
Launch the
LBRServerapplication on theKUKA smartPAD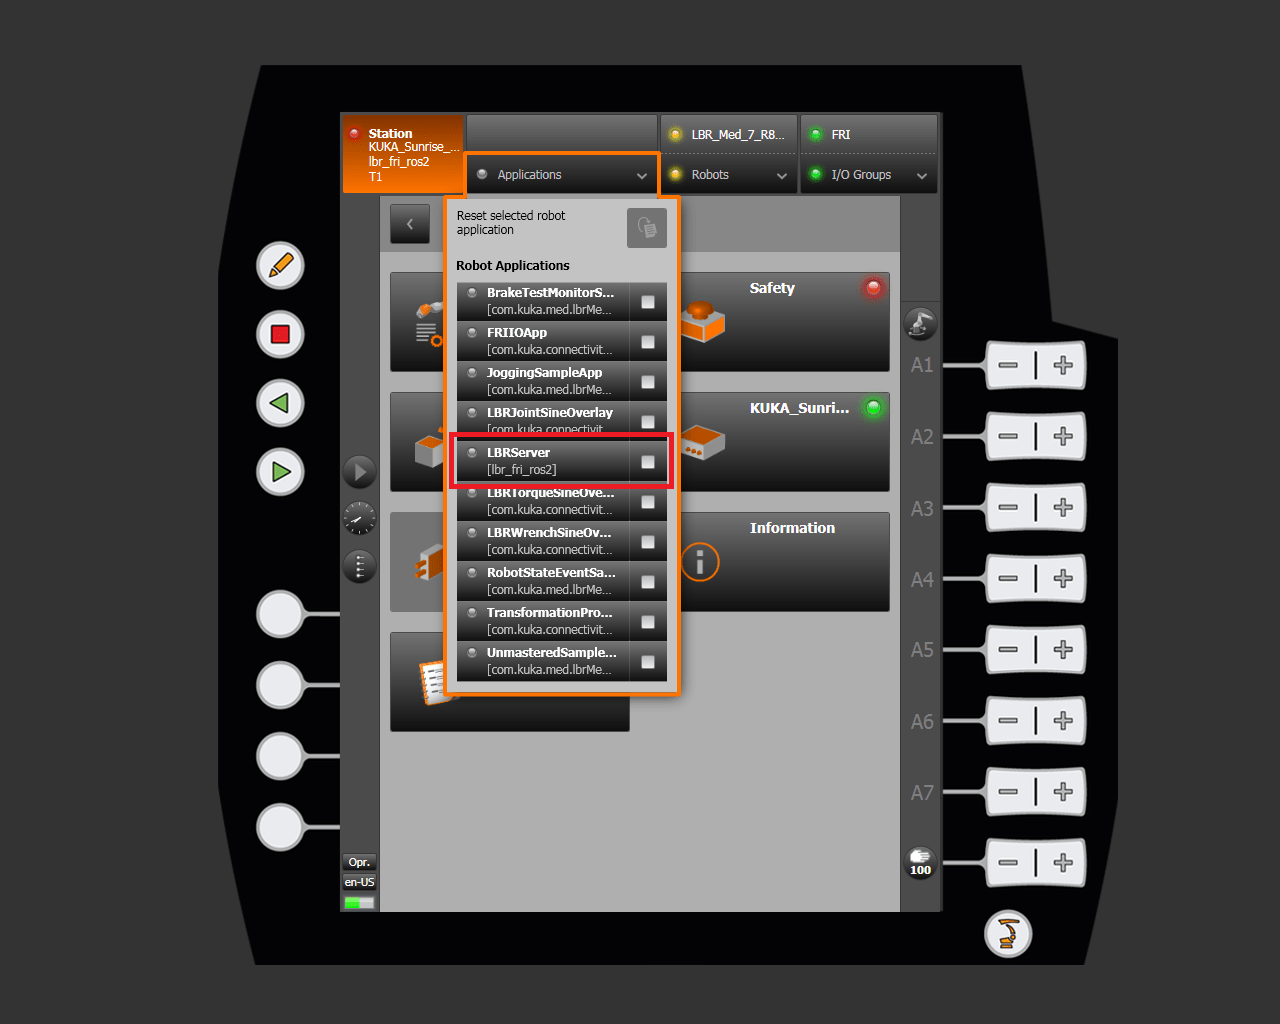
Select
FRI send period:10 msIP address:your configurationFRI control mode:POSITION_CONTROLFRI client command mode:POSITION
Client side:
python3 hand_guide.py --lbr-ver 7
Now gently move the robot’s end-effector to see the robot follow your movements.
Joint Teleoperation
Source code: joint_teleop.py
This example application lets users control individual joints via the keyboard.
Remote side configurations:
Launch the
LBRServerapplication on theKUKA smartPAD
Select
FRI send period:10 msIP address:your configurationFRI control mode:POSITION_CONTROLFRI client command mode:POSITION
On the client side, run:
python3 joint_teleop.py
Press 1-7 to enable / disable the corresponding joint. Press left / right arrow keys to move the joint.
Task Teleoperation
Source code: task_teleop.py
This example application lets users control the end-effector of the robot via the keyboard.
Remote side configurations:
Launch the
LBRServerapplication on theKUKA smartPAD
Select
FRI send period:10 msIP address:your configurationFRI control mode:POSITION_CONTROLFRI client command mode:POSITION
On the client side, run:
python3 task_teleop.py --lbr-ver 7 # or 14 if you are using med14 / iiwa14
Press x, y, z, r, p, a to enable the a specific axis. Press left / right arrow keys to move the axis.
KUKA Default Demos
These demos mirror the demos that are provided with the C++ FRI client SDK from KUKA, only using the Python bindings instead.
LBR Joint Sine Overlay
Source code: LBRJointSineOverlay.py
Remote side configurations:
Launch the
LBRServerapplication on theKUKA smartPAD
Select
FRI send period:10 msIP address:your configurationFRI control mode:POSITION_CONTROLFRI client command mode:POSITION
Client side:
python3 LBRJointSineOverlay.py # based on examples provided by KUKA
You should see joint A4 moving in a sine wave.
LBR Torque Sine Overlay
Source code: LBRTorqueSineOverlay.py
Remote side configurations:
Launch the
LBRServerapplication on theKUKA smartPAD
Select
FRI send period:2 msIP address:your configurationFRI control mode:JOINT_IMPEDANCE_CONTROLFRI client command mode:TORQUE
Client side:
python3 LBRTorqueSineOverlay.py # based on examples provided by KUKA
You should see joint A4 moving in a sine wave.
LBR Wrench Sine Overlay
Source code: LBRWrenchSineOverlay.py
Remote side configurations:
Launch the
LBRServerapplication on theKUKA smartPAD
Select
FRI send period:2 msIP address:your configurationFRI control mode:CARTESIAN_IMPEDANCE_CONTROLFRI client command mode:WRENCH
Client side:
python3 LBRWrenchSineOverlay.py # based on examples provided by KUKA
You should see the end-effector circulating.